How to purchase and manage Floating IPs
Learn more about our floating IPs including how to order, how to manage these additional IPv4 and IPv6 addresses and how to set PTR.
A floating IP is a publicly accessible IP address that can be easily transferred from one of your servers to another in a matter of seconds. They help minimize downtime while also creating a highly available infrastructure, extremely useful when you have to deal with scheduled or unpredictable downtime, which can be caused by routine maintenance or targeted network attacks.
How to order a Floating IP?Copy link
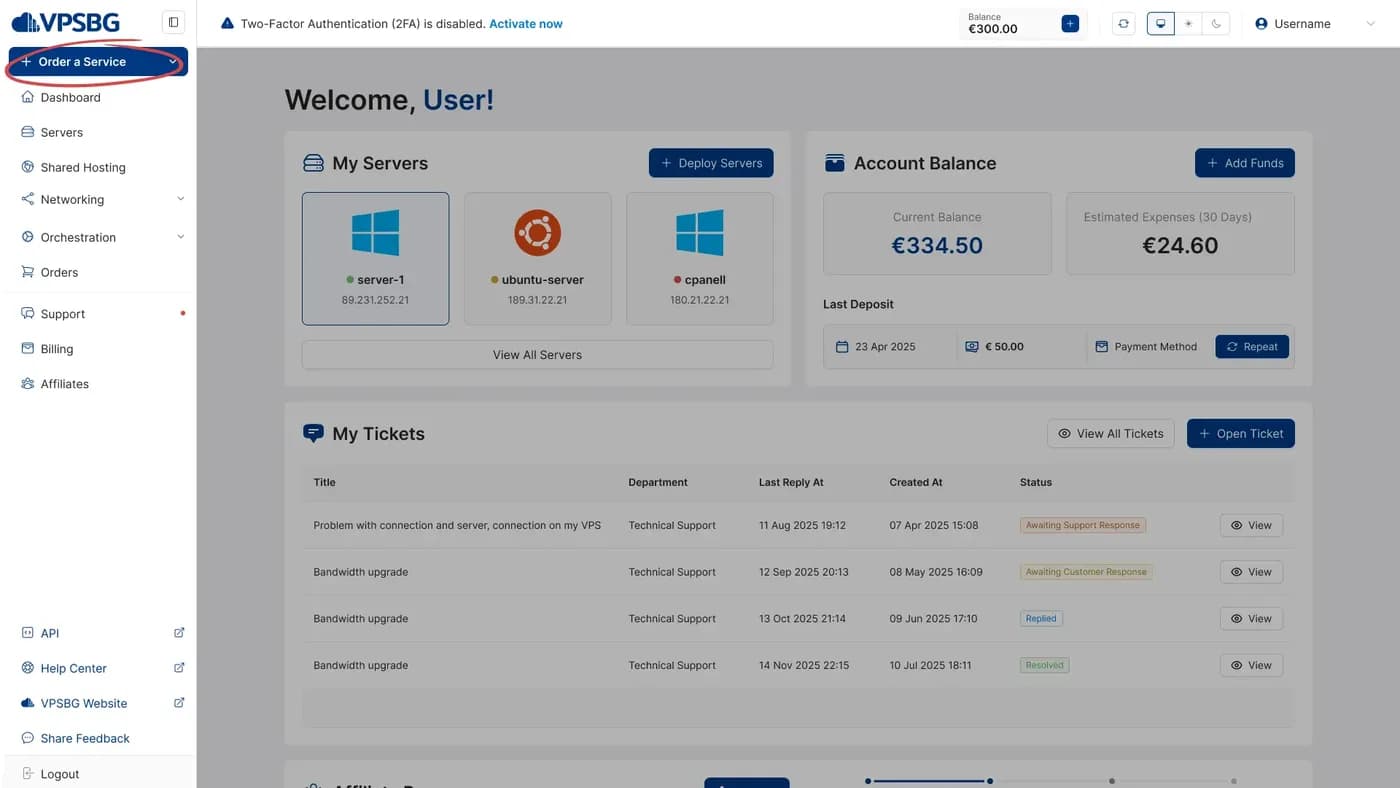
You can easily order a floating IP through the console. First, log into the VPSBG console and then click on the ‘New Service’ button:
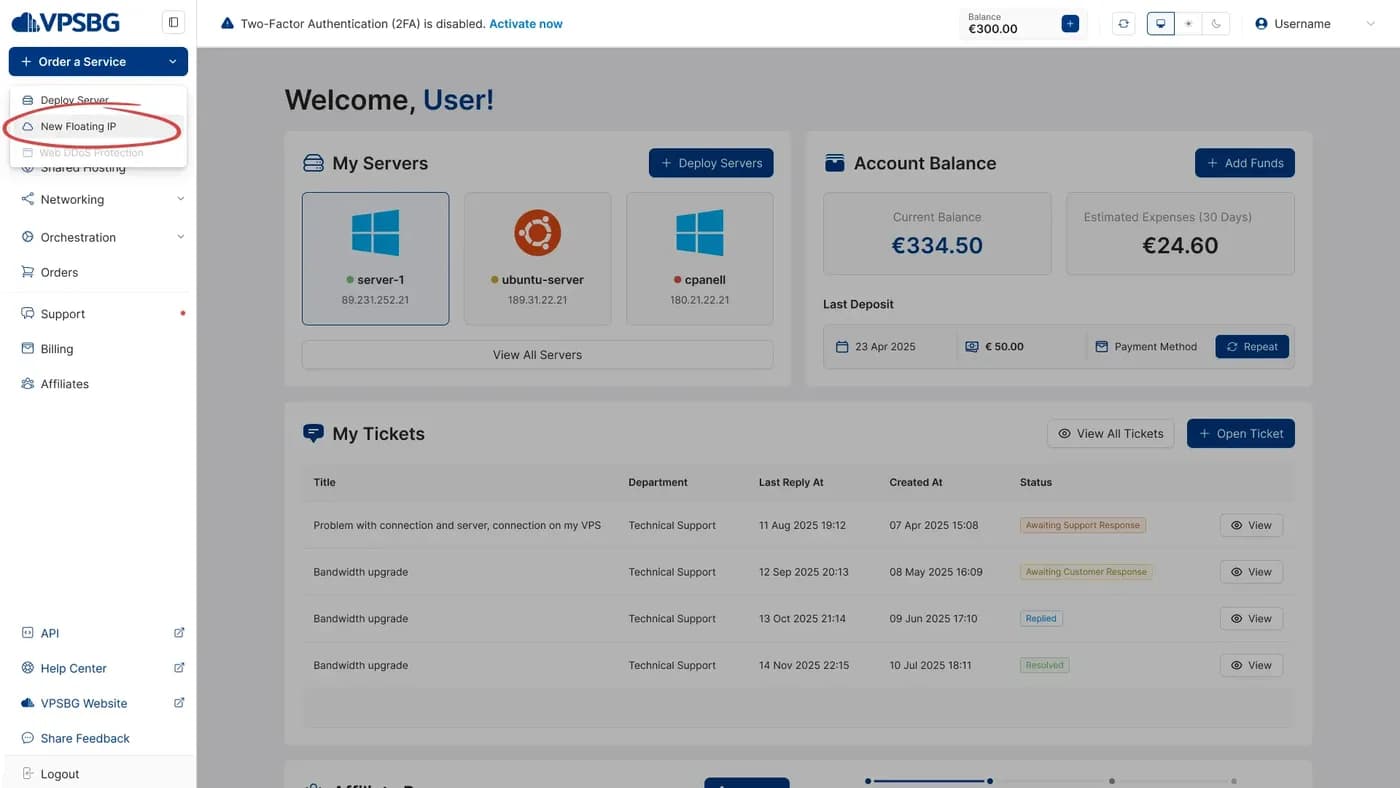
Next, click on ‘Order Floating IPs’:
This will take you to the floating IP configurator, allowing you to select the amount of floating IPs and DDoS-protected floating IPs that you would like to order:
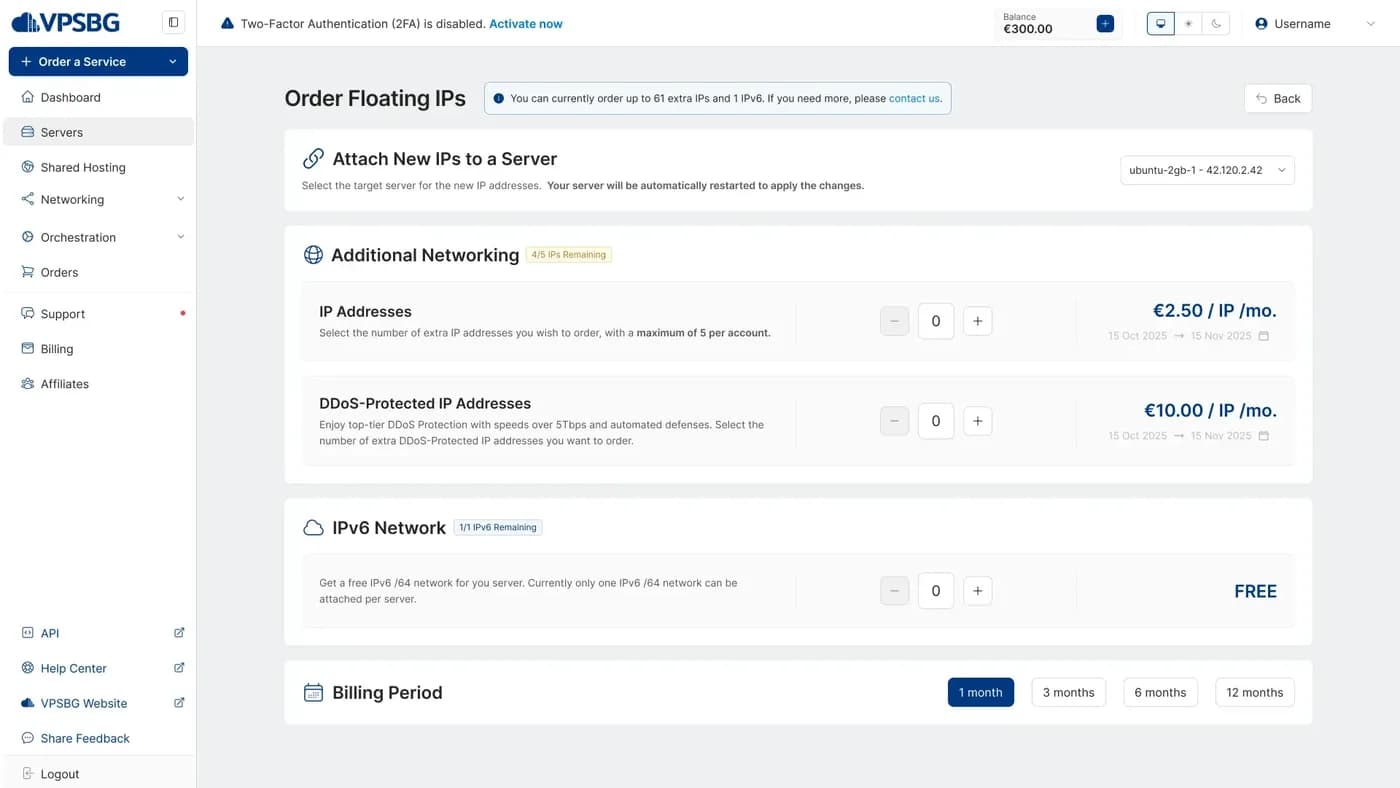
Our traditional and DDoS-protected floating IPs have a combined total cap of 5. This means that if you get 4 floating IPs, you will only be able to get 1 DDoS-protected floating IP. If you wish to extend this limit, please contact us.
Once you have selected the number of IPs that you’d like, you have the option to immediately attach them to a given server by selecting from the dropdown:
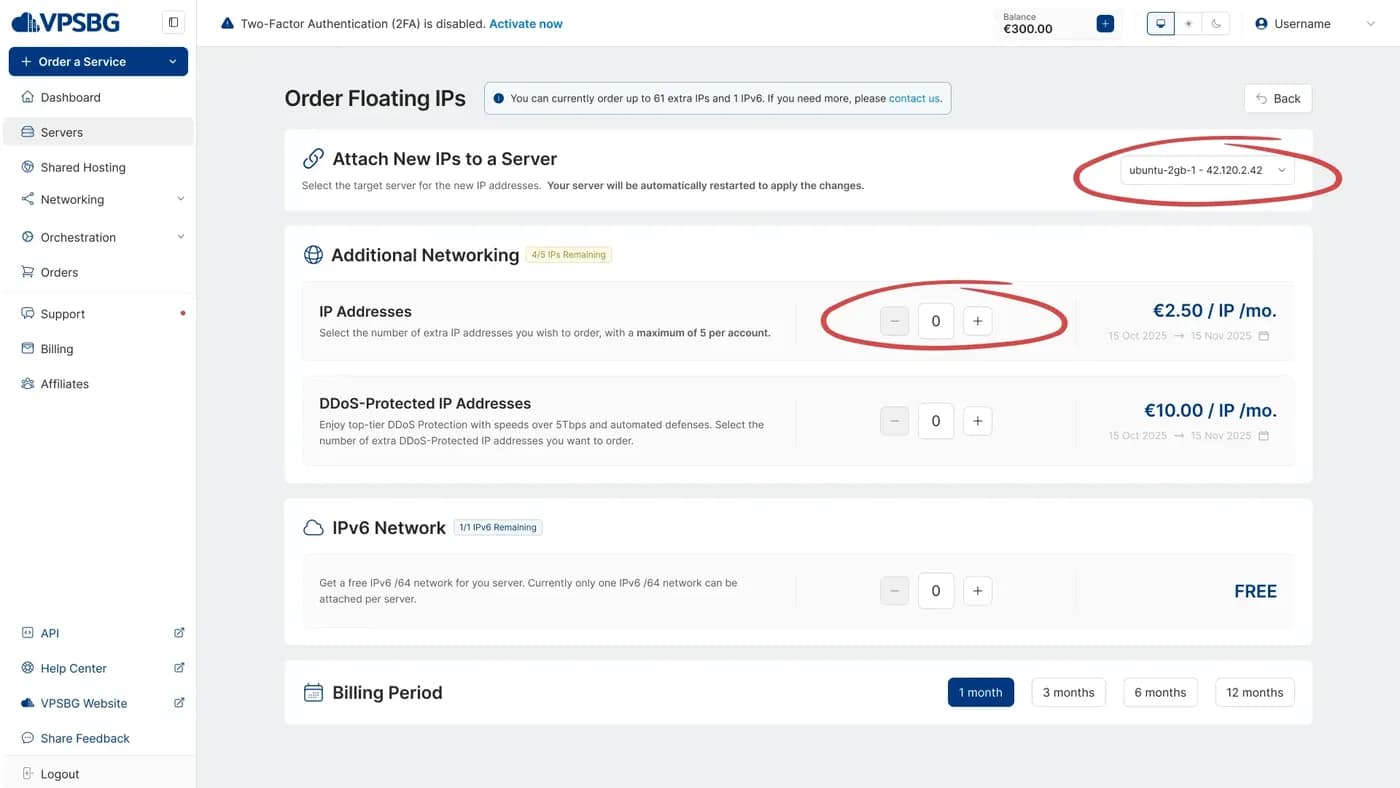
If you do attach the floating IPs, their billing cycle will be automatically synced with the billing cycle of the designated server. If you decide to not attach your floating IPs during purchase, you will have the option to manually select a billing cycle for your IPs.
How to attach or detach a Floating IP to your serverCopy link
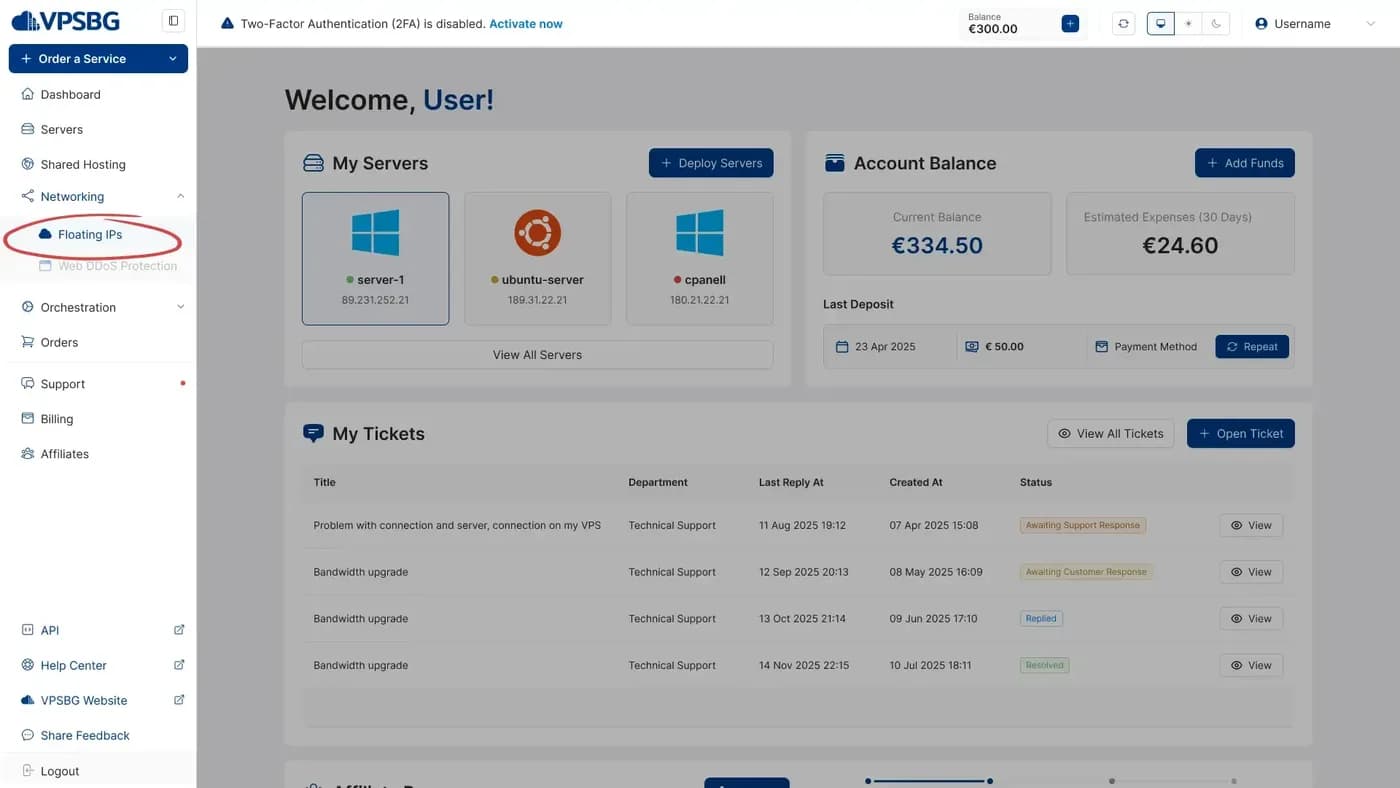
Navigate to the ‘Networking’ tab and then click on the ‘Floating IPs’ button.
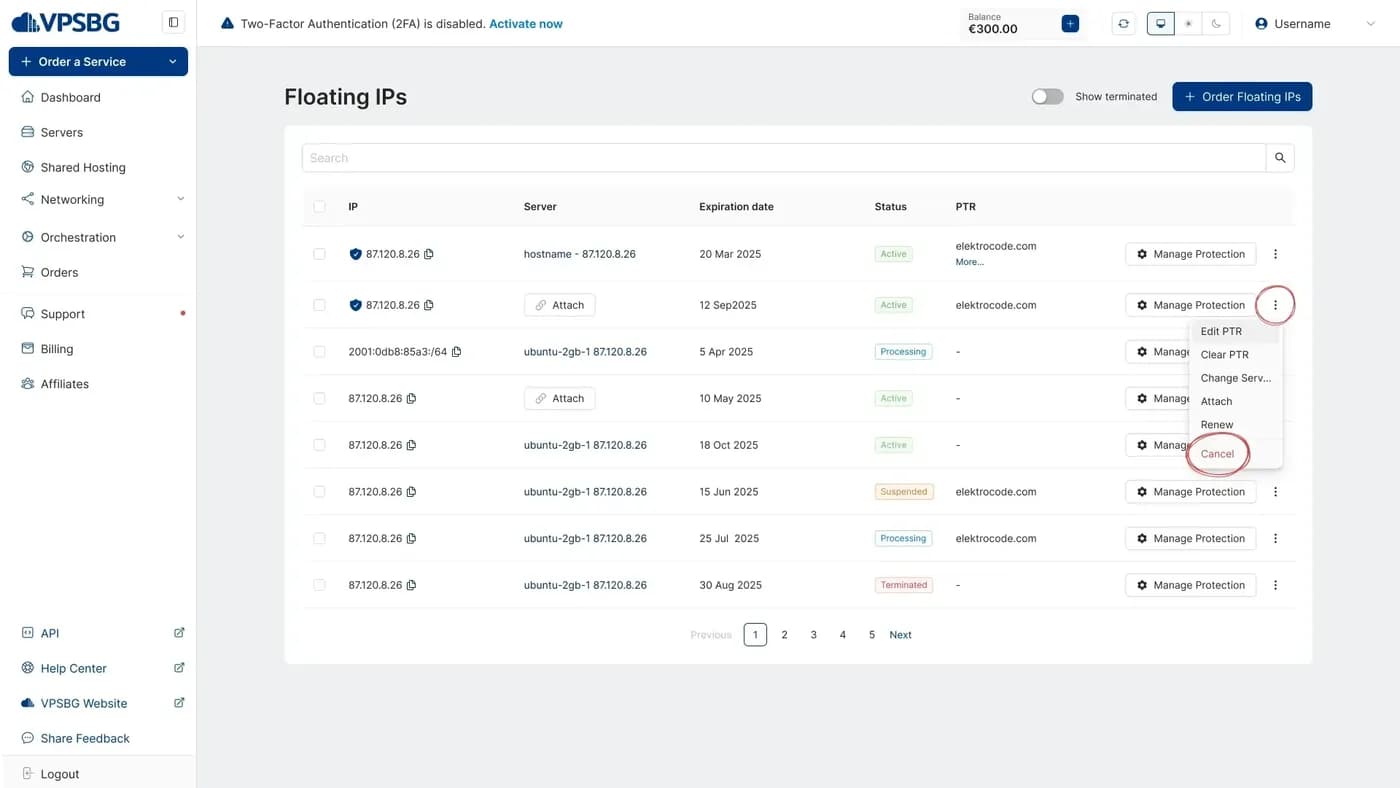
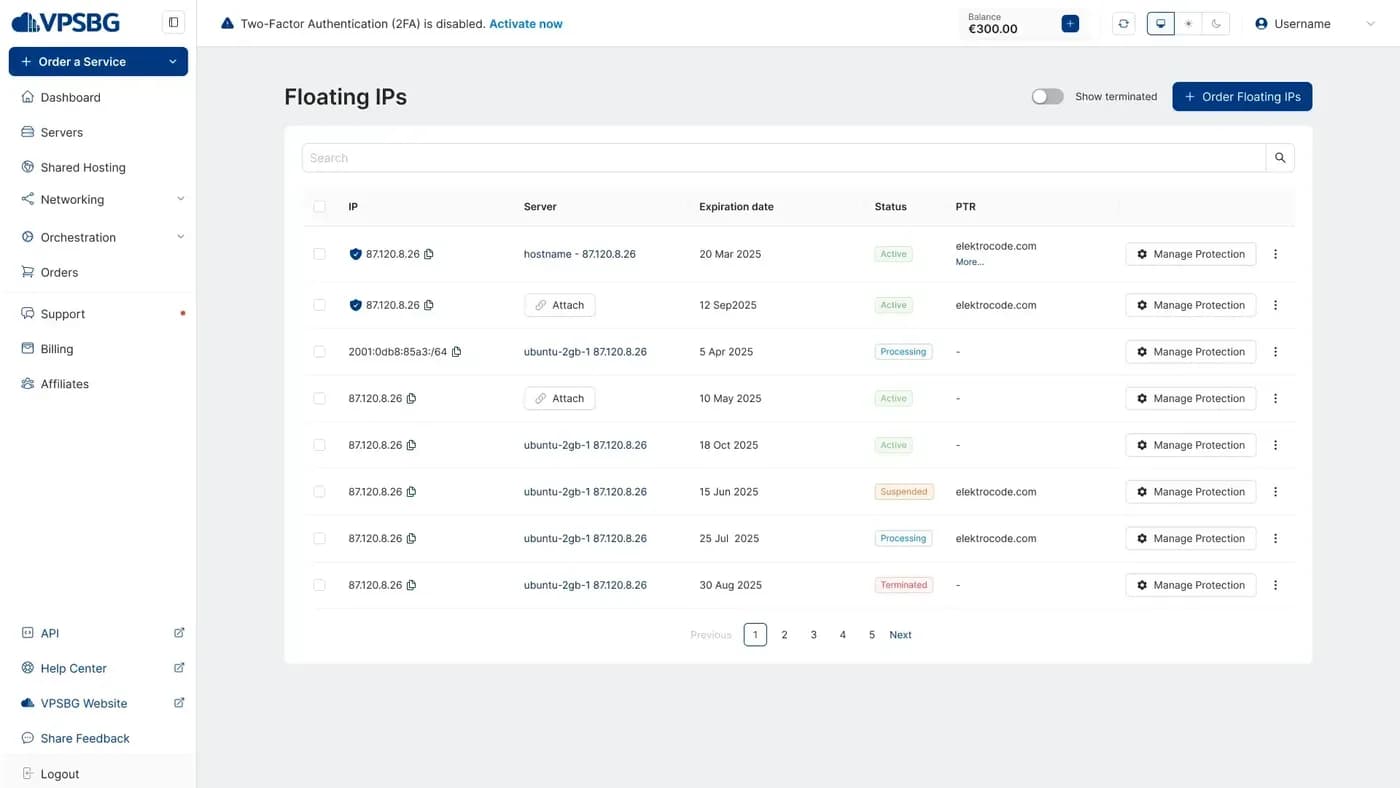
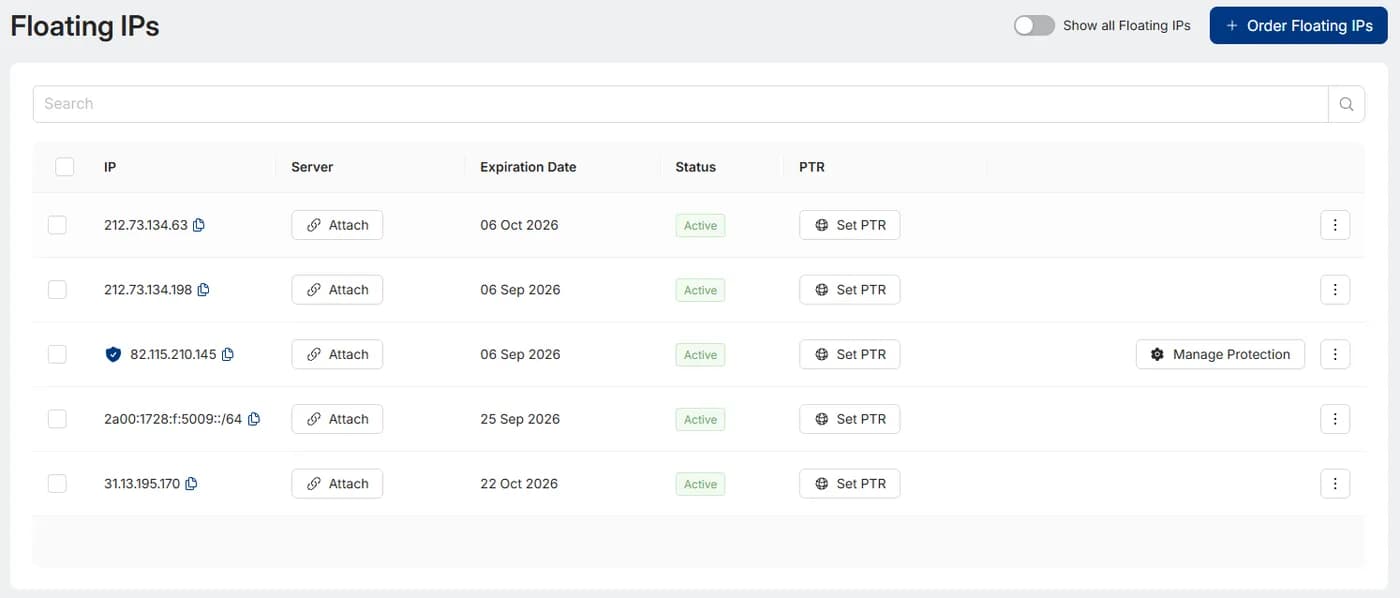
You will then see a list of all of your IP addresses:
Each floating IP has its own actions menu, which can be accessed by clicking on the 3 dots as seen:
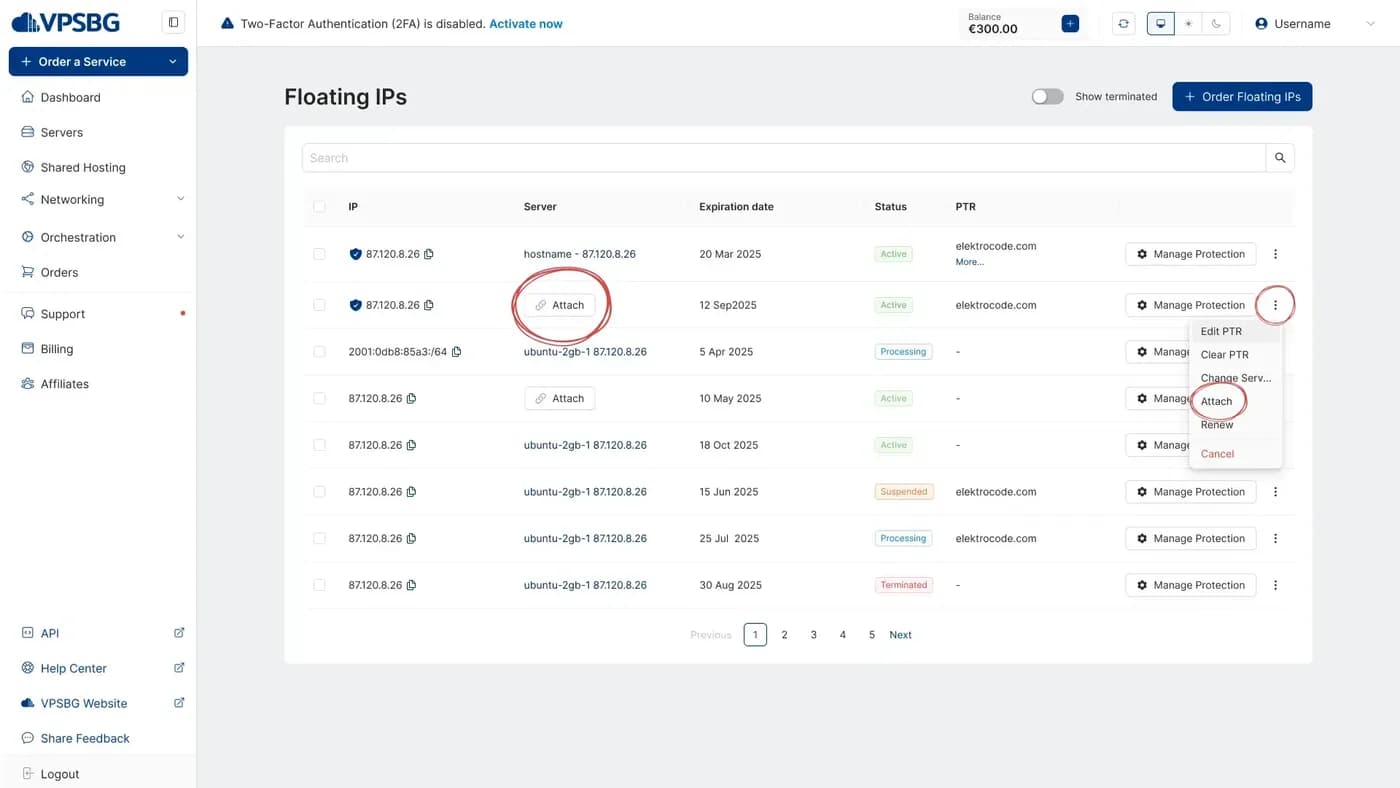
To attach an IP to a server, click on the ‘Attach’ button. A configuration window with a list of your servers will appear. After you have chosen a server, press the ‘Attach’ button. If you wish to detach a floating IP, you can do so by clicking on the detach button next to the IP or the detach button via the same menu.
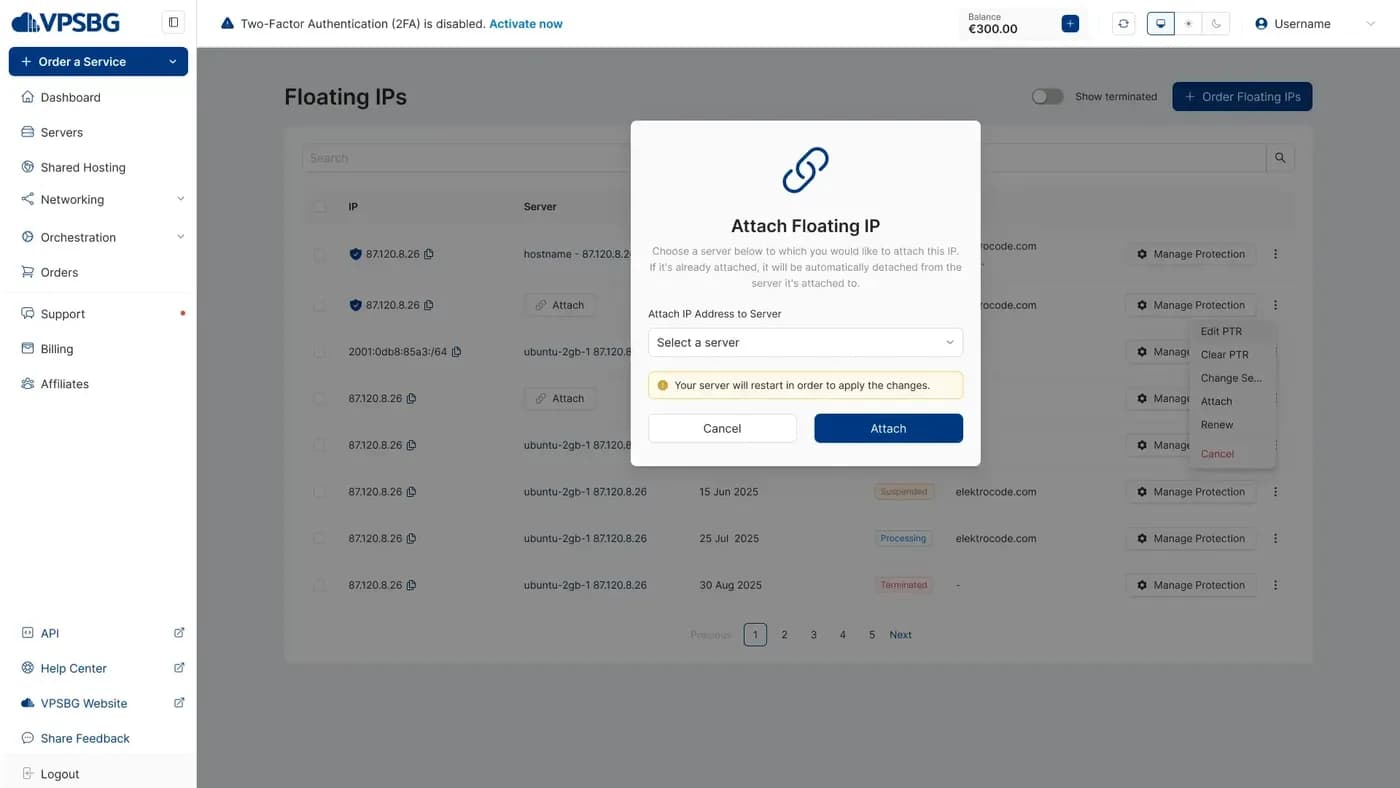
When attaching an IP, the server will automatically reboot in order to apply the changes.
How to manually manage additional IPv4 addresses on Ubuntu & DebianCopy link
You will need to identify your public network interface:
ip addr show scope globalThe expected interface name is eth0. If your interface has a different name, substitute it for eth0 in the steps below.
You should also check if Netplan is present:
ls /etc/netplanIf files are listed, follow the steps below. If not, your server may use /etc/network/interfaces for the network configuration instead of Netplan, which we are going to cover after the netplan file setup.
Netplan configurationCopy link
Next, create a new netplan file:
install -m 600 /dev/stdin /etc/netplan/60-additional-ipv4.yaml <<'EOF'
network:
  version: 2
  ethernets:
    eth0:
      addresses:
        - 192.0.2.3/32
EOF
Make sure to replace 192.0.2.3/32 with the IPv4 address in your account.
If you wish to assign multiple addresses, list each one on its own line under addresses:
addresses:
  - 192.0.2.3/32
  - 192.0.2.4/32
If you previously added an address using this method, edit the existing file rather than creating a new one.
To remove an address, simply delete its line from the YAML file. If there is only a single IP address there and you want it removed, you will need to delete the whole file.
Next, apply the configuration:
netplan applyFinally, verify that the IP is present:
ip addr show eth0You should see the additional IPv4 address(es) listed with /32. This configuration is persistent and will survive on reboot.
Network configuration uses /etc/network/interfacesCopy link
In cases where your network configuration uses /etc/network/interfaces, here's an example config with one main IPv4 address (192.0.2.3) and two additional IPv4 addresses (192.0.2.4, 192.0.2.5). Replace these example addresses with your own assigned IP addresses.
auto lo
iface lo inet loopback

auto eth0
iface eth0 inet static
    address 192.0.2.3
    netmask 255.255.255.255
    gateway 172.16.0.1
    pointopoint 172.16.0.1

auto eth0:0
iface eth0:0 inet static
    address 192.0.2.4
    netmask 255.255.255.255

auto eth0:1
iface eth0:1 inet static
    address 192.0.2.5
    netmask 255.255.255.255
After editing the file, restart networking or reboot the server for the changes to take effect.
How to manually manage additional IPv4 addresses on AlmaLinux, Rocky Linux, FedoraCopy link
First, find the active NetworkManager connection profile:
nmcli -f NAME,DEVICE,TYPE connection show --activeThen, identify the connection whose DEVICE is eth0. The connection name is usually "cloud-init eth0" or "System eth0". Use that name in the commands below.
Add an additional IPv4 address (replace 192.0.2.3 with your purchased address):
nmcli connection modify "cloud-init eth0" +ipv4.addresses 192.0.2.3/32To assign multiple addresses, run the same command once for each address.
If you want to remove an address, use “-” instead of “+”:
nmcli connection modify "cloud-init eth0" -ipv4.addresses 192.0.2.3/32Next, apply the changes by reactivating the connection:
nmcli connection up "cloud-init eth0"Make sure to verify:
ip addr show eth0You should see the additional IPv4 address(es) with /32. This configuration is persistent and will survive reboot.
How to manage IPv6 addresses on Ubuntu and DebianCopy link
If your interface name differs from eth0, substitute it in the steps below (see the IPv4 guide for how to identify your interface).
Start by creating a new netplan file:
install -m 600 /dev/stdin /etc/netplan/60-additional-ipv6.yaml <<'EOF'
network:
  version: 2
  ethernets:
    eth0:
      addresses:
        - 2a00:1728:f:100::1/64
      routes:
        - to: default
          via: fe80::1
EOF
Replace 2a00:1728:f:100::1 with an address from your assigned /64 subnet.
To use multiple addresses from your subnet, list each one under addresses:
addresses:
  - 2a00:1728:f:100::1/64
  - 2a00:1728:f:100::2/64
  - 2a00:1728:f:100::100/64
To remove an address, delete its line from the file.
The routes section and at least one address must remain! Delete the file to remove any previously set additional IPv6 configuration.
Next, apply the configuration:
netplan applyMake sure to verify that everything is set correctly:
ip -6 addr show eth0
ip -6 route
You should see your IPv6 address(es) with /64 on eth0 and a default route via fe80::1.
How to manage IPv6 addresses on AlmaLinux, Rocky Linux, FedoraCopy link
Firstly, find the active NetworkManager connection profile:
nmcli -f NAME,DEVICE,TYPE connection show --activeThen, identify the connection whose DEVICE is eth0. The connection name is usually "cloud-init eth0" or "System eth0". Use that name in the commands below.
Add an IPv6 address and set the gateway (replace 2a00:1728:f:100::1 with an address from your assigned /64 subnet):
nmcli connection modify "cloud-init eth0" +ipv6.addresses 2a00:1728:f:100::1/64
nmcli connection modify "cloud-init eth0" ipv6.gateway fe80::1
To assign additional addresses from your subnet, run the first command again with each new address. The gateway only needs to be set once but can safely be repeated.
If you wish to remove and address that you have already added, you can do so with:
nmcli connection modify "cloud-init eth0" -ipv6.addresses 2a00:1728:f:100::1/64To remove all manually added IPv6 configuration:
nmcli connection modify "cloud-init eth0" ipv6.gateway ""
nmcli connection modify "cloud-init eth0" ipv6.addresses ""
Apply the changes by reactivating the connection:
nmcli connection up "cloud-init eth0"Make sure to verify:
ip -6 addr show eth0
ip -6 route
You should see your IPv6 address(es) with /64 on eth0 and a default route via fe80::1.
How to manage floating IPs on a Windows ServerCopy link
Managing additional IPv4 or IPv6 addresses for a Windows Server happens by first connecting through RDP and then making the required network settings changes.
How to assign and remove an additional IPv4 IP on WindowsCopy link
Start by typing ‘control panel’ in Windows search. Then click on the control panel option and select ‘Network And Internet’:
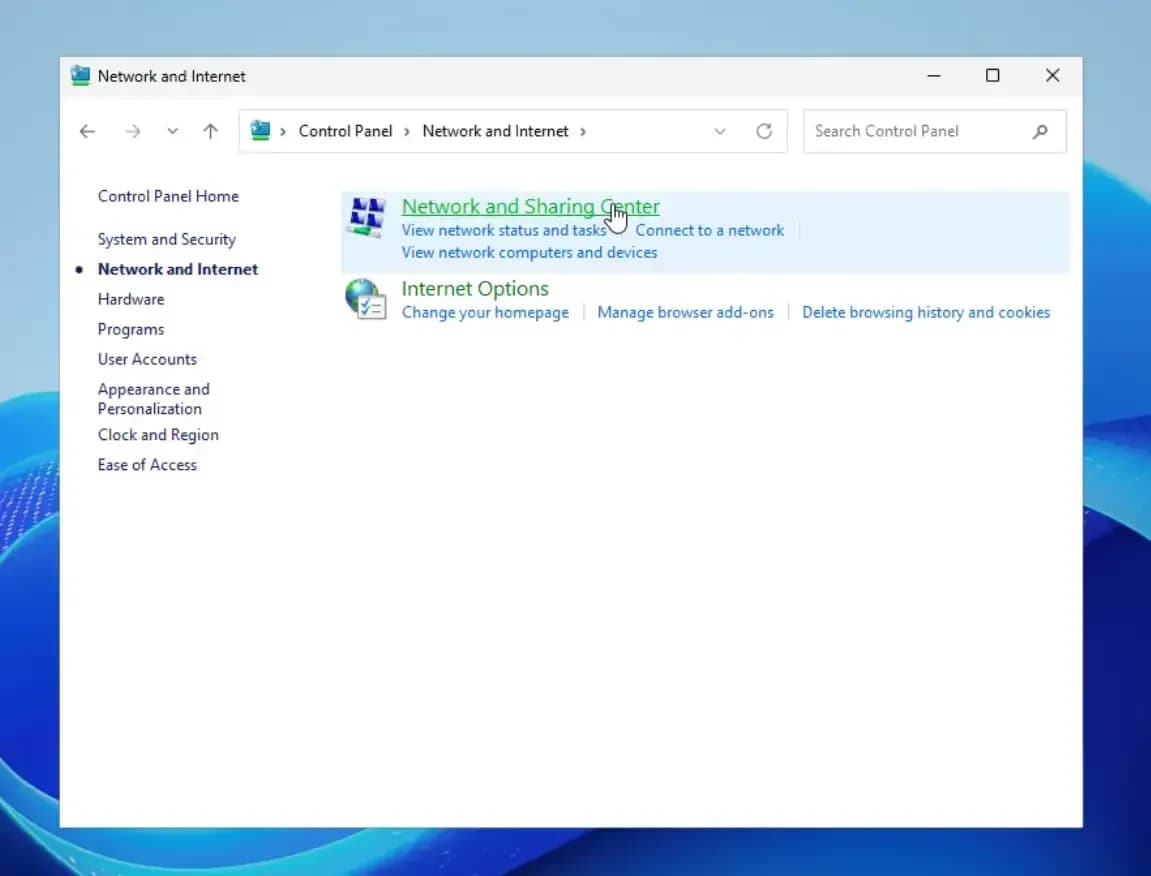
Click on ‘Network And Sharing center’ and then on the ‘Change adapter settings’ option, which will be located in the menu on the left side. You should see one network adapter like so:
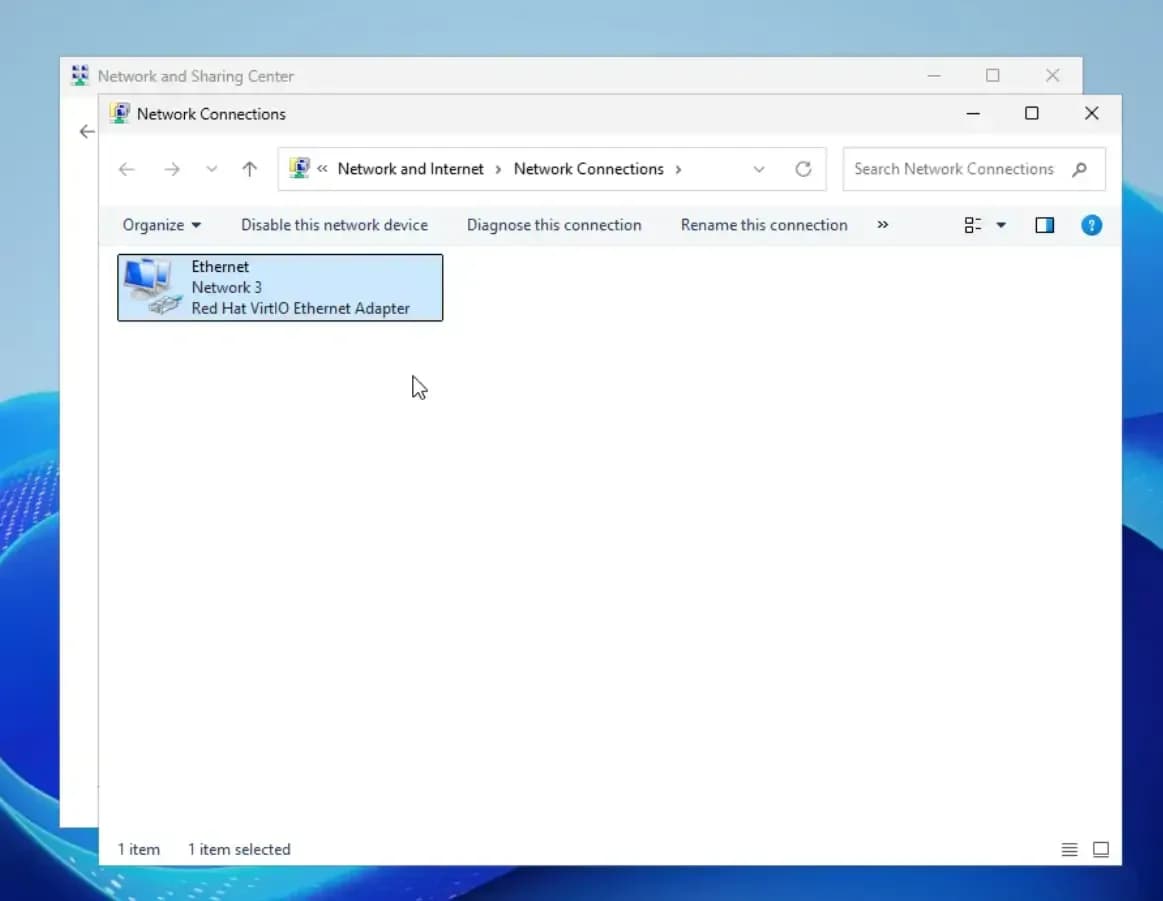
Right-click on this network adapter and select ‘Properties’. Then go to the ‘Internet Protocol Version 4 (TCP/IPv4)’ option and click on the ‘Properties’ button.
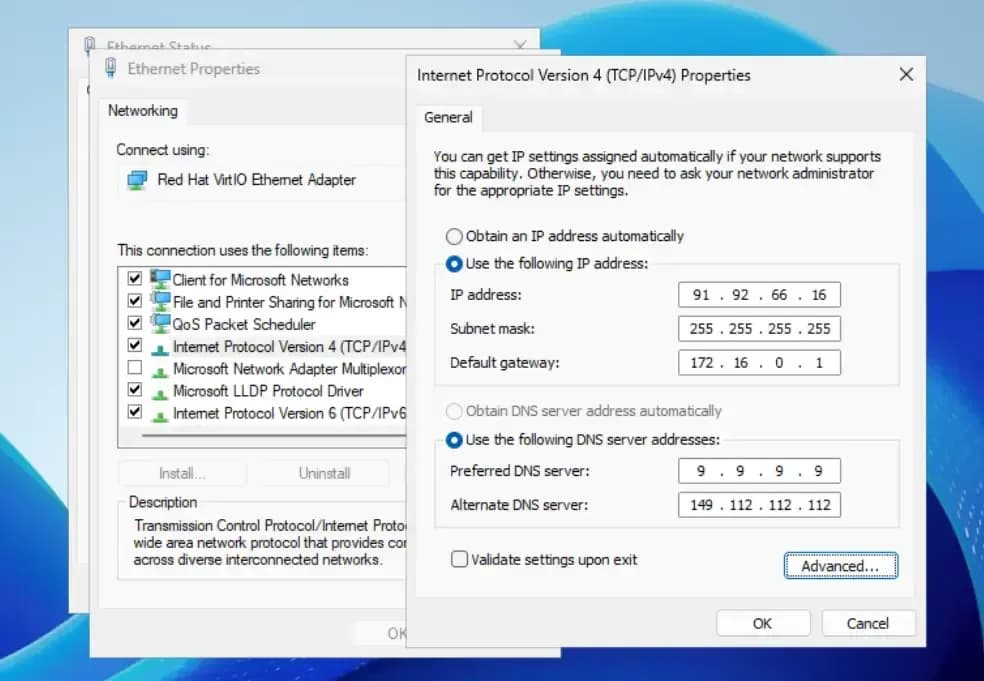
Following that, click on the Advanced button in the bottom right corner of the Internet Protocol Version 4 (TCP/IPv4) Properties window.
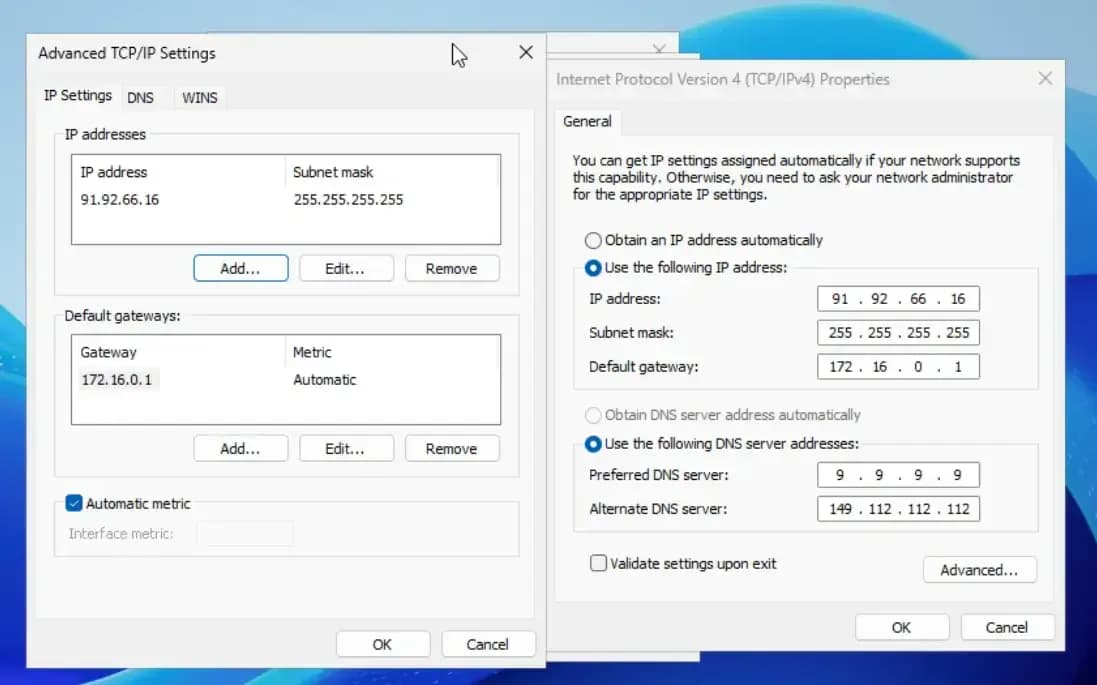
Now you can click on the Add… button shown above and then you can type in your additional IP address. For example, if your IP is 87.121.52.91, you will need to enter this IP in the first field. In the second (Subnet mask) you will need to input: 255.255.255.255.
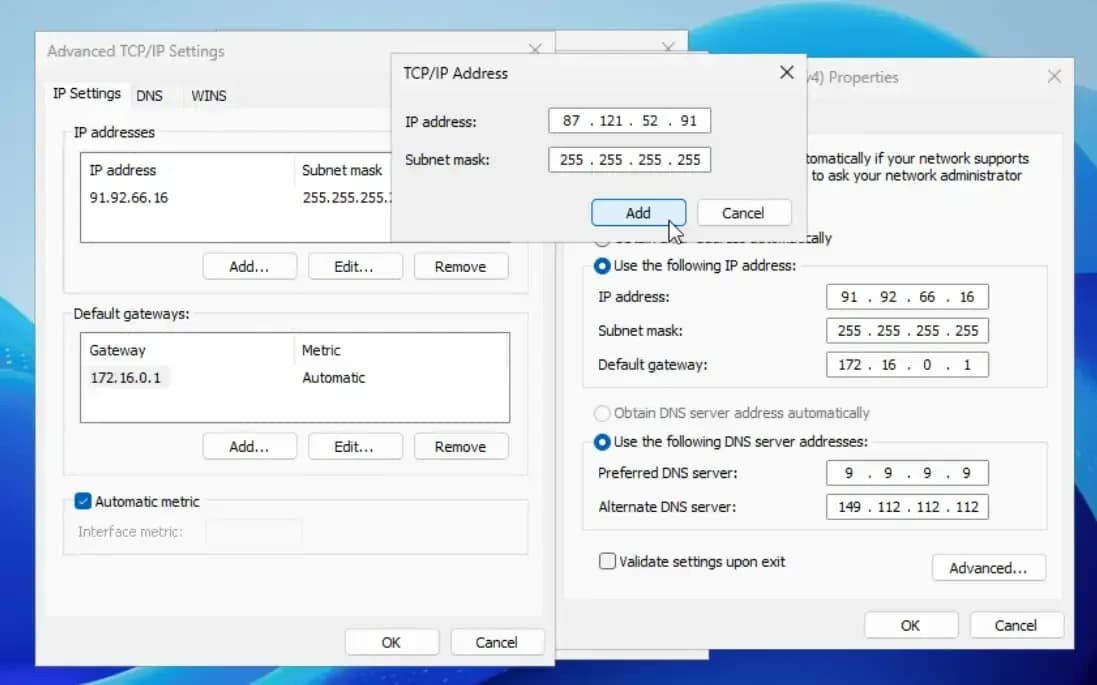
Click on the Add button and finally, click ‘OK’ several times to close everything once finished.
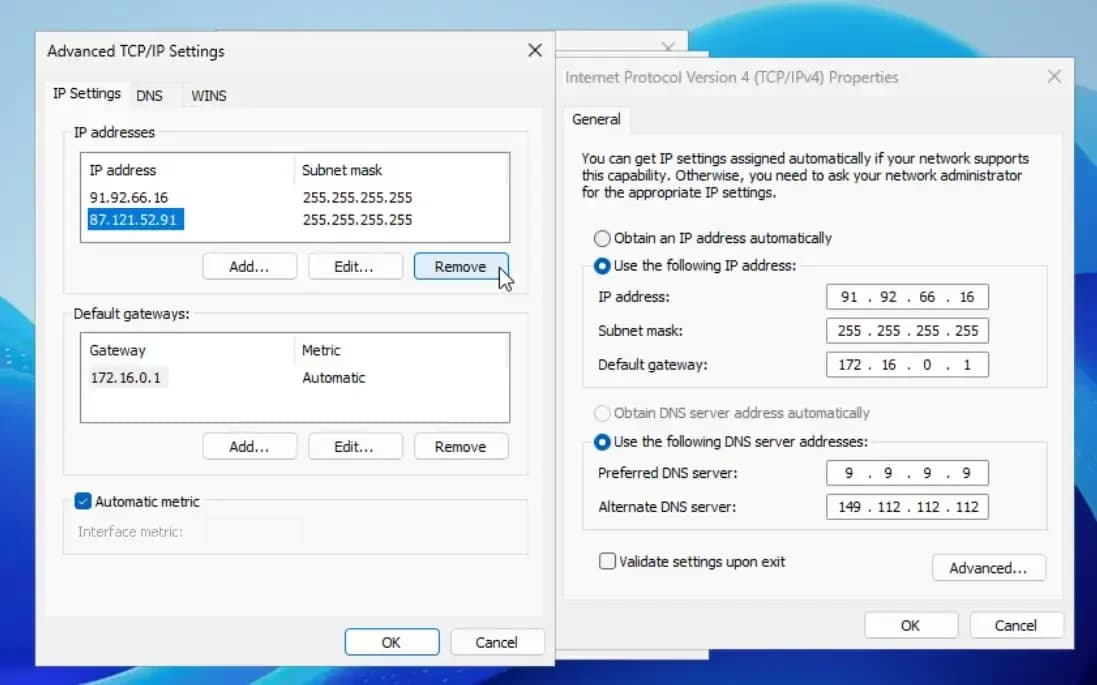
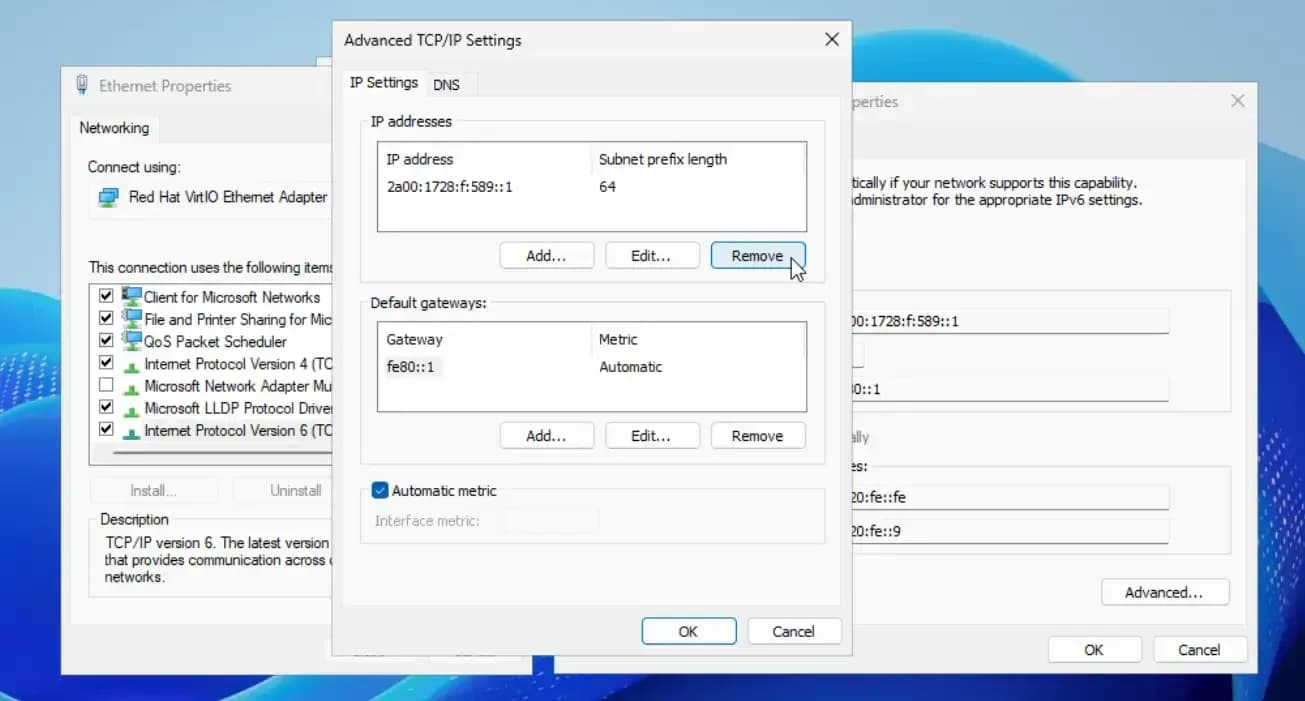
If you want to remove your additional IPv4 IP you should select it first and then click Remove as we show in the screenshot below. Bear in mind that when you click the Remove button you won’t be prompted to confirm your decision - it’ll directly remove it.
How to assign and remove a main IPv6 IP on WindowsCopy link
Go to the ‘Internet Protocol Version 6 (TCP/IPv6)’ option and click on the ‘Properties’ button. Once the Properties window opens up you need to select the Use the following IPv6 address line.
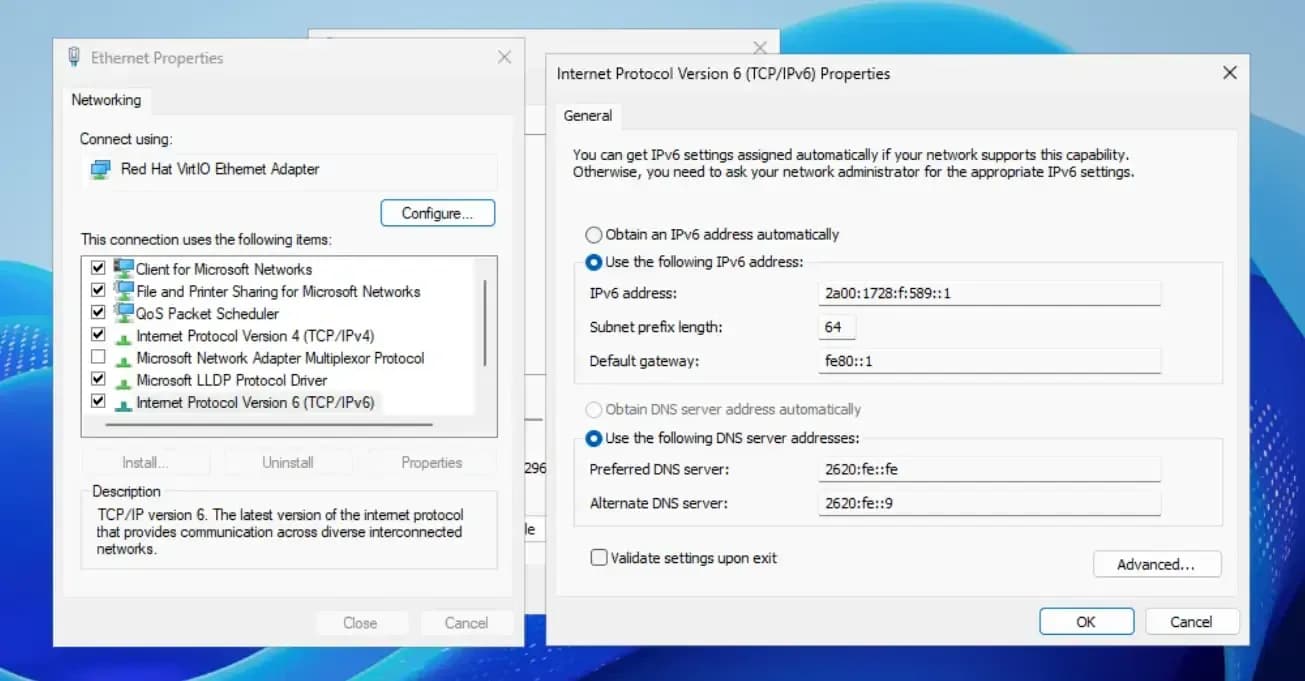
Make sure your ‘Subnet prefix length’ and your ‘Default gateway’ are the same as the once shown in the screenshot above. When you’re ready you can click OK and close all other windows.
Removing an IPv6 is just as easy. Simply click on Advanced in the bottom right corner and in the following windows select the IP address and click Remove.
How to set a PTR (reverse DNS) record for an IP addressCopy link
To set a PTR record, go to the Floating IPs page from the Networking menu. For each of your floating IPs, you will see a Set PTR button in the PTR column:
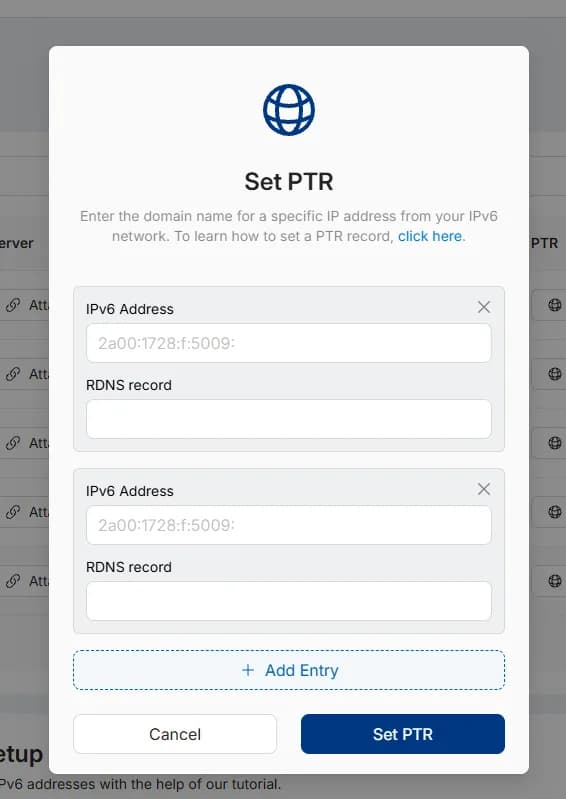
Enter the full domain name and after making sure that all of the information is correct, press ‘Set PTR’.
It is necessary for the record to be a valid FQDN (fully qualified domain name)!
You can also set PTR for IPv6 IP groups. To set multiple PTR records, use the add button.
How to cancel a Floating IPCopy link
To cancel an IP, go to the Floating IPs page from the Networking tab and click on the 3 dots. From the available options, select Cancel IP and confirm.