SSH Keys
Learn more about SSH keys, how to create them and how to deploy a server using an SSH key as well as how to change your SSH port.
SSH, also referred to as Secure Shell, is an administration protocol designed to help you operate your system remotely. It is mainly utilized to authenticate and establish the connection from your machine to the server in order to set up a secure environment for file transferring, command-line execution and port forwarding.
In general, SSH functions in a similar way to passwords, however, they are more secure due to the extra layers of security. Because of this, it is essential and recommended to use SSH keys when connecting to your server remotely.
Each SSH key consists of a public and private key pair. The public key is stored on the server and determines who can gain access to the system. The private key is sent to you separately each time you log into the remote system. You should never share your private key with anyone!
How to generate SSH keys with OpenSSH (Linux/macOS)Copy link
It's generally easier to generate a key if you are using Linux or Mac. This is because both operating systems have the standard OpenSSH suite of tools already installed. This also includes the ssh-keygen utility which is required in order to generate SSH key pairs.
Firstly, open up your terminal and type the following command:
$ ssh-keygenAfter that, you will be asked to select a location for the keys. By default, the keys are stored in the ~/.ssh directory with the filenames id_rsa (private key) and id_rsa.pub (public key).
We recommend you keep the default locations because it will allow your SSH client to automatically locate your SSH keys upon authentication. If you would like to keep the default placement, then hit ENTER:
Output
Generating public/private rsa key pair.
Enter file in which to save the key (/home/user/.ssh/id_rsa):
If you have already generated a key pair before, you will be asked to confirm that you would like to overwrite the existing key with a message that will look like so:
Output
/home/user/.ssh/id_rsa already exists.
Overwrite (y/n)?
If you decide to overwrite the existing key, you won’t be able to authenticate with it anymore. If you are confident that you would like to continue and overwrite it, you can do that by typing Y and hitting ENTER.
If you decide to keep the default location, your private and public keys will be located in /home/user/.ssh/id_rsa.pub and /home/user/.ssh/id_rsa respectively as we mentioned before.
Once you select your desired location, you will be asked to enter an optional passphrase to encrypt your private key file on the disk. This step is entirely optional. However, if you decide to enter the passphrase, you will need to provide it every time you use this key. While this can be an additional extra step when logging in, we recommend doing it as it adds another layer of security. If you wish to skip this step, just press ENTER.
Output
Created directory '/home/user/.ssh'.
Enter passphrase (empty for no passphrase):
Enter same passphrase again:
Once completed, your system will generate a pair of SSH keys.
Output
Your identification has been saved in /home/user/.ssh/id_rsa.
Your public key has been saved in /home/user/.ssh/id_rsa.pub.
The key fingerprint is:
a9:49:EX:AM:PL:E3:3e:a9:de:4e:77:11:58:b6:90:26 user@203.0.113.0
The key's randomart image is:
+--[ RSA 2048]----+
|     ..o         |
|   E o= .        |
|    o. o         |
|        ..       |
|      ..S        |
|     o o.        |
|   =o.+.         |
|. =++..          |
|o=++.            |
+-----------------+
How to generate an SSH key pair on WindowsCopy link
In order to generate an SSH key pair on your Windows machine, we recommend installing PuTTY. Once you have downloaded and installed the client, you will also get the PuTTY keygen tool, which can be used to generate SSH keys. Here’s how to do it:
- Open up the PuTTY keygen tool.
- Click on the Generate button.
- Move your cursor around inside of the gray box until you fill the green bar located above.
- Then click on the ‘Save public key’ and choose a name and location to which you want to save it.
- Click on the ‘Save private key’ button. You can also set a passphrase for your key, but similarly to Mac or Linux - is not necessary. Finally, choose a name and location to which you would like to save the private key to.
How to deploy a server with an SSH keyCopy link
If you wish to add an SSH key to your server via the VPSBG Console, you have to do so on deployment. In the server configurator, navigate to the Authentication section and select SSH Key. Click on the Add SSH Key button. This will open up a configuration window where you can paste in your public key and give it a name:
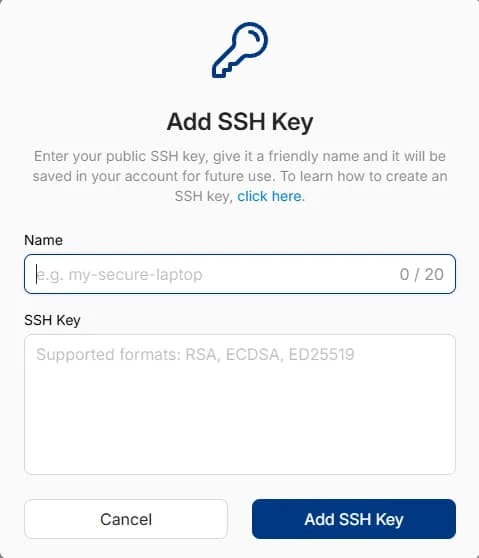
Click on add and your key will automatically be pre-selected. You will also be stored on your account, allowing you to re-use it for other servers.
Once you have deployed a server with an SSH key, we can’t verify its integrity via the VPSBG Console. This means that if you make changes to your keys once logged into your server via SSH, we will not be able to reflect them in the Console so make sure you keep track of your settings if making changes!
How to use my SSH key pair to connect to my serverCopy link
If you didn’t deploy a server with an SSH key, you can still manually add it to your virtual machine and connect.
To do this, you will need to manually place and configure your public key, located in the /home/user/.ssh/id_rsa.pub file, onto the remote server. You should paste your public key in the authorized_keys file for the specific user.
For example, if you want to use this key to log in as the root user, you have to place your public key in /root/.ssh/authorized_keys. If you want to login as another user such as ‘example’, you will want to paste your public key in /home/example/.ssh/authorized_keys.
Once you have configured your keys, your server shouldn’t ask you for a password the next time you log in.
If your private key is not in the default directory (/home/user/.ssh/id_rsa), it will not be discovered automatically. You have to manually add the path to your private key when you log into your server. You can do so by typing in the -i parameter followed by the path of your private key such as: ssh root@your_server_ip -i /home/user/.ssh/my-key.
Mac/LinuxCopy link
Open up your terminal and enter the following command:
ssh {user}@{host}This command tells your system that you want to open an encrypted Secure Shell Connection, while {user} and {host} respectively represent the account and the machine or server (which can also be an IP address or a domain name) that you are trying to access.
Once you press ENTER, you will be asked to enter the password for the account you are trying to log into. Type your password and press ENTER once again and you will be successfully logged into the remote access terminal.
WindowsCopy link
Log in using PuTTY. Open up the client and navigate to the Host Name field and enter the IP address or the hostname of your server, to which you wish to connect remotely. In the Port field, enter your SSH port number. Next, click the Open button. Upon connecting to your server for the first time, you will be prompted to accept the SSH certificate.
How to change your SSH portCopy link
Changing the SSH port ensures better security for your server(s). By default the port is set to 22 and not changing these default settings could result in your server being susceptible to online attacks.
To start, log into your server via SSH as you will need to change the ‘/etc/ssh/sshd_config’ file
Make sure to make a backup of this file before making any changes! To make a copy of the file use this command:
cp /etc/ssh/sshd_config /etc/ssh/sshd_config_Once you have made a copy of the file, open the config with your preferred editor. We are going to be using ‘vim’. The command to run vim is:
vim /etc/ssh/sshd_configYou should now see a screen similar to this:
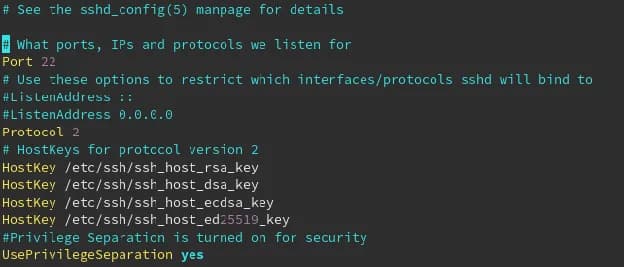
You should immediately be able to identify the line that corresponds to the SSH port - Port 22.
If this line commented out (has a # sign before Port 22), you will need to remove the #. Next, to edit the file, press ‘i’. This will switch the system into editing mode. You can now edit the file and change the SSH port to something like 22002 or another port that you like.
Don’t set the port to another one which is already in use!
Finally, press the [ESC] button and type ‘:x’ to save and exit vim.
In order for your changes to be applied, you will need to restart the sshd service:
service sshd reloadMake sure to check whether your server has a firewall installed! If it does, check the rules and make sure to add your new SSH port to the firewall configuration settings. If you don’t, you will not be able to connect to your server via SSH!
You can also use the following command to check the syntax:
sshd -t